
That gap under your garage door isn't just letting in cold air. It's costing you money on heating bills, inviting pests inside, and putting extra wear on your garage door system. Weather stripping wears out faster than most other garage door components because it scrapes against concrete, fights temperature swings, and takes a beating from rain and snow.
The good news? Unlike spring replacement or cable work, weather stripping replacement is genuinely DIY-friendly. You don't need special tools, you won't risk injury, and most homeowners complete the job in under an hour. Whether you're seeing visible cracks in your seals or just noticing drafts during winter, replacing worn weather stripping pays for itself through energy savings and prevents bigger problems down the road.
This guide walks you through recognizing when your seals need replacement, understanding what professional service costs compared to doing it yourself, choosing the right materials for your climate, and avoiding the mistakes that cause most DIY installations to fail early.
Did You Know? Worn weather stripping can increase heating and cooling costs by 20-30% in garages attached to living spaces. That gap under your door might be costing you $15-30 monthly in wasted energy.
When your garage door seals actually need replacing
Start with a visual inspection twice a year, ideally in spring and fall. Look for cracks in the rubber, brittleness that causes pieces to break off when you bend the seal, or compression that no longer rebounds when you press it. If you see gaps larger than 1/8 inch between the seal and the door frame, replacement is overdue.
The lift test tells you everything about bottom seal condition. Close your garage door during daylight and look for light visible underneath. Any light means air is getting through. For a more precise check, run your hand along the bottom of the closed door on a windy day. If you feel airflow, the seal has failed.
Most weather stripping lasts 2-5 years depending on material quality and climate severity. Vinyl seals in hot climates often fail within 2-3 years, while EPDM rubber in moderate conditions can reach 5 years. Heavy garage use, with 5+ open-close cycles daily, accelerates wear.
Quick Test: Close your garage door and place a dollar bill under the bottom seal. Try to pull it out. If it slides out easily without resistance, your seal isn't making proper contact and needs replacement.
What professional replacement costs vs doing it yourself
Professional weather stripping replacement runs $150-$450 for a standard single-car garage door. That price includes materials ($45-$100) and labor ($100-$350), with the work taking 1-2 hours. Double doors cost more, typically $250-$650, because they require more material and labor time.
Materials alone cost $7-$30 per linear foot depending on quality. A standard single 8x7 door needs roughly 35-40 linear feet total (8-9 feet for the bottom, 28 feet for sides and top). You're looking at $50-$150 in materials if you buy everything yourself. Budget vinyl kits start around $30, while premium silicone systems run $100-$150.
The DIY time investment is 30-60 minutes for a straightforward installation. You'll need basic tools most homeowners already have: utility knife, hammer, measuring tape, and screwdriver. Professional service makes sense when you're dealing with door alignment problems, rusted tracks that need cleaning, or multiple damaged seals requiring panel work.
| Door Size | Professional Cost | DIY Materials Cost | Labor Time |
|---|---|---|---|
| Single (8x7) | $150-$450 | $50-$150 | 1-2 hours |
| Double (16x7) | $250-$650 | $100-$250 | 2-3 hours |
Energy savings typically recoup 20-50% of replacement costs in the first year. If you're spending $100-$200 annually on extra heating or cooling because of poor seals, a $200 investment pays itself back quickly. Compare professional quotes if you're unsure about tackling this yourself.
Choosing the right weatherstripping material for your situation
Three materials dominate the market, each with distinct advantages. Vinyl costs least at $7-$20 per foot and works fine in mild climates, but it fails below freezing and typically lasts just 2-3 years. EPDM rubber, priced $15-$25 per foot, handles temperature swings from -20°F to 200°F and lasts 3-5 years with proper maintenance. Silicone, the premium option at $20-$30 per foot, withstands extreme temperatures from -40°F to 400°F and often exceeds 5 years.
Your climate dictates material choice more than budget. If you live where winter temperatures regularly drop below zero, vinyl will crack and fail within a season. Northeast and Midwest homeowners should default to EPDM or silicone. Southern and coastal areas can save money with quality vinyl that won't face harsh freezing.
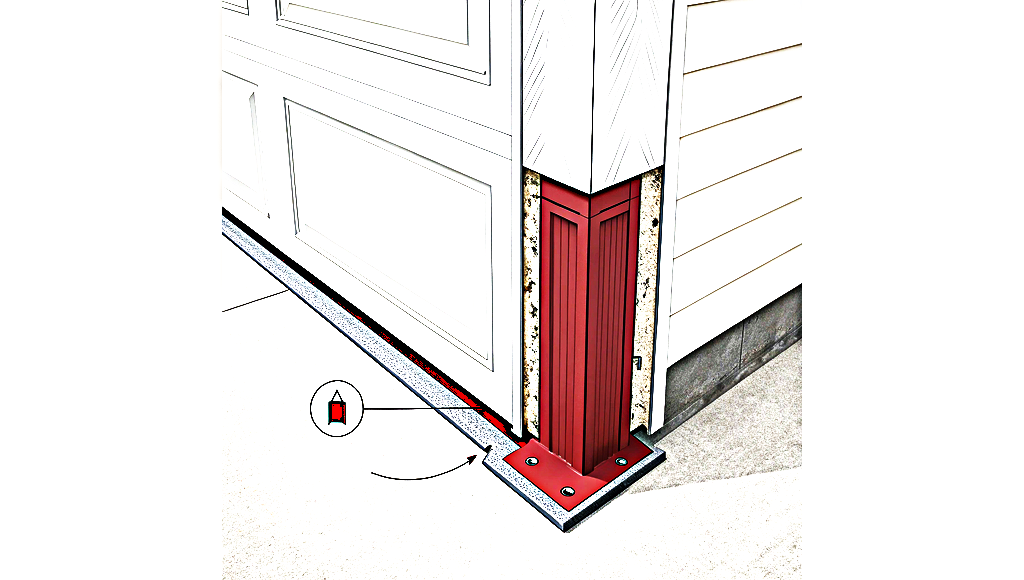
Bottom seals differ from side and top seals. Look for bulb-style or T-shaped profiles for bottom positions because they compress well against uneven concrete floors. Side and top positions work better with kerf seals (inserted into grooves) or reverse-angle profiles that shed water. Don't buy a universal kit and expect perfect results for all positions.
Pro Tip: The cheapest material often costs more long-term. A $30 vinyl seal that fails in 18 months means you're replacing it again, spending more on materials and your time. A $75 EPDM seal lasting 4 years costs less per year and saves you the hassle of frequent replacement.
Check your winterizing strategy to understand how weather stripping fits into seasonal garage preparation. For detailed cost breakdowns across different material qualities, see our weatherstripping cost guide.
The replacement process and common mistakes to avoid
Measure your door width and height before buying materials. For bottom seals, measure the exact width and add 2 inches for trimming. Side and top seals require measuring each section separately because heights vary. Most hardware stores can cut seals to length, but buying slightly long and trimming yourself ensures perfect fit.
Surface preparation matters more than most DIYers realize. Remove the old seal completely, then scrape off any adhesive residue or rust. Clean the track channel with degreaser and let it dry. Dirty or rusty surfaces reduce new seal adhesion by 60%, causing premature failure. This prep work takes 10 minutes but doubles the lifespan of your installation.
The biggest mistakes are buying undersized seals that don't match your track type, skipping the cleaning step, and choosing cheap vinyl for harsh climates. Another common error is replacing only the bottom seal when side and top seals are equally worn. You'll just be back doing this job in six months when the other seals fail.
After installation, test your work with a garden hose. Spray water along all seal positions with the door closed. No water should penetrate inside. If you spot leaks, the seal isn't seated properly in its channel. For ongoing protection, add weatherstripping checks to your maintenance schedule and lubricate seals annually to prevent premature drying and cracking.
Taking action on worn seals
Weather stripping replacement stands out as one of the few garage door repairs you can confidently handle yourself without special tools or safety concerns. The key decisions come down to choosing materials that match your climate and deciding whether visible alignment or rust issues mean you should hire a professional instead.
Inspect your seals this weekend using the light test and visual checks described above. If you're seeing gaps or feeling drafts, address the problem before winter hits or summer heat arrives. Proactive replacement costs less than emergency service and prevents the energy waste that adds up month after month.
For help finding qualified local professionals if you'd prefer expert installation, visit GarageDoorHandbook to compare vetted contractors in your area. Quality weather stripping protects your larger investment in the garage door system and keeps your space comfortable year-round.
FAQs
How do I know when my garage door weather stripping needs replacement?
Look for visible cracks, brittleness, or compression that doesn't spring back when pressed. Close your garage door during daylight and check for light visible underneath. Run your hand along the bottom seal on a windy day. If you feel air or see light gaps larger than 1/8 inch, your weather stripping has failed and needs replacement.
What's the average cost to replace garage door weather stripping?
Professional replacement costs $150-$450 for a single-car garage door, including materials and labor. DIY materials alone run $50-$150 for the same door. Vinyl seals cost $7-$20 per foot, EPDM rubber runs $15-$25 per foot, and premium silicone costs $20-$30 per foot. Most homeowners complete DIY installation in 30-60 minutes.
Which weather stripping material lasts longest for garage doors?
Silicone weather stripping lasts longest, often exceeding 5 years, and handles extreme temperatures from -40°F to 400°F. EPDM rubber lasts 3-5 years and works well from -20°F to 200°F. Vinyl is cheapest but only lasts 2-3 years and fails in freezing temperatures. Choose based on your climate, not just price.
Can I replace garage door weather stripping myself?
Yes, weather stripping replacement is genuinely DIY-friendly and takes 30-60 minutes. You need basic tools like a utility knife, hammer, and measuring tape. Measure your door, remove old seals, clean the surface thoroughly, and install new seals. Call a professional only if you have door alignment issues or rusted tracks.